
The Ultimate Guide to Rhythm Guitar for Adults
Updated August 8, 2026
Every great band is built on rhythm guitar, not flashy solos or screaming leads, but instead it focuses on chords, the groove, the pulse that makes everyone in the room move. Rhythm is the backbone of music, and the best rhythm guitarists are the most in-demand musicians on the planet. They’re the ones who get called for gigs, who make bands and singers sound better, and who hold everything together when things go wrong.
If you’ve been playing guitar and feel stuck in a loop of strumming the same open chords, or if you’re an adult picking up the instrument for the first time, this guide is your complete roadmap for developing rhythm guitar skills that actually make you sound professional. From foundational timing to advanced chord voicings, everything you need is here.

This guide was developed by the working Boston musicians at Musicians Playground in Boston, drawing from the same curriculum framework we use in our private lessons and BAND+ ensemble program.
What Is Rhythm Guitar?
Rhythm guitar involves playing chords and riffs in time, locked in with the rest of the rhythm section (drums, bass, and keys). Together, these instruments form the harmonic and rhythmic foundation that everything else sits on top of. While lead guitar focuses on melodies, solos, and improvisation, rhythm guitar plays a supportive role that’s every bit as demanding and musical.
Despite being underrated compared to lead guitar, rhythm guitar is what gets musicians hired, what makes bands sound tight, and what separates a casual player from someone who can actually perform. Malcolm Young of AC/DC, James Hetfield of Metallica, and Nile Rodgers of Chic. They are some of the most iconic and importnt guitarists in history, and they’re all rhythm players first.
The Foundation: Timing Is Everything
Before chords, before techniques, before anything else, timing is the non-negotiable foundation of rhythm guitar. You can play the right chords with good tone and still sound wrong if your timing isn’t solid. Rhythm guitar lives and dies by when notes happen, not just what notes you play.
Great rhythm players develop an internal pulse, the ability to feel the beat even when nothing external is keeping time. This means not relying on a metronome, drummer, or another musician to tell you where the beat is. When you have strong internal time, you can lock in with a drummer and make the entire band feel relaxed and confident.
Subdivisions: What Lives Between the Beats
Rhythm isn’t just about hitting beats 1, 2, 3, and 4. The magic lives in the subdivisions, whether it’s quarter notes, eighth notes, triplets, or sixteenth notes. These subdivisions determine the feel of the music you’re playing. A song with straight eighth notes feels completely different from one with triplet subdivisions, even if the chords are identical.
Your picking hand is the key to feeling subdivisions. Move it continuously in a down-up motion that matches the subdivision of the song. If your hand isn’t feeling the subdivisions, your rhythm will sound vague and disconnected instead of tight and intentional.
How to Improve Your Timing
Practice with a metronome! There’s no substitute. Start by playing simple chord progressions at a slow tempo and focus on placing every strum exactly on the beat. Once that feels natural, practice placing notes on the “and” counts (the upbeats) to develop your subdivision feel. If you have the opportunity to play with a drummer, take it. Nothing develops your internal clock faster than locking in with another rhythm player in real time.
Essential Chords: Your Vocabulary
Chords are the vocabulary of rhythm guitar. The more chord types you know and the more fluently you can move between them, the more musical and versatile your playing becomes. Our complete chord guide covers each type in depth. Here’s the learning sequence.
Open Chords (Start Here)
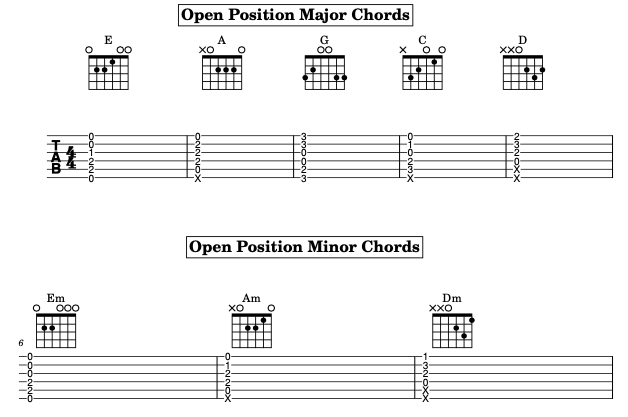
Every guitarist begins with the following open chord shapes: C, A, G, E, D (major), and Am, Em, Dm (minor). These shapes use open strings and form the foundation for everything that follows. Major chords sound bright and happy; minor chords sound darker and more melancholy.
Two critical details beginners often miss: when playing C, A, D, Am, or Dm, you must mute the low E string by letting your thumb lightly touch it from behind the neck. And transitioning between chords smoothly is just as important as forming the shapes themselves. Practice chord changes in time with a metronome from day one.
Barre Chords
Barre chords take open chord shapes and make them movable across the entire fretboard. Your index finger acts as a capo, pressing across all six strings while your remaining fingers form the chord shape. The most useful barre chord shapes are E, Em, A, and Am because they’re ergonomic and easy to transition between. Below are the four most commonly used movable barre chord shapes played in the key of C:
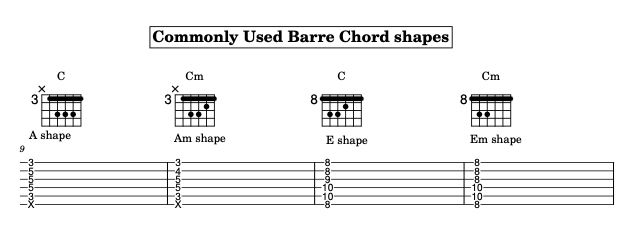
Barre chords are a common frustration for beginners because they require hand strength that takes time to build. The solution is to optimize your technique: position your index finger on its harder, bony side, keep your thumb centered on the back of the neck, and bring your elbow toward your rib cage so your hand stays parallel to the frets. Our complete barre chord guide walks through these adjustments in detail.
Power Chords
Power chords strip a chord down to just the root and 5th, removing the major or minor third. The result is an aggressive, tonally ambiguous sound that defines rock, punk, and metal. Songs like “Highway to Hell,” “Smells Like Teen Spirit,” “Iron Man,” and “American Idiot” are all built on power chords.
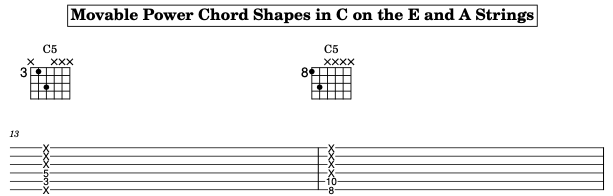
Power chords are simple to play and incredibly versatile. Learn the movable shape on the E and A strings as seen below, and you can play in any key anywhere on the neck.
Triads (Intermediate)
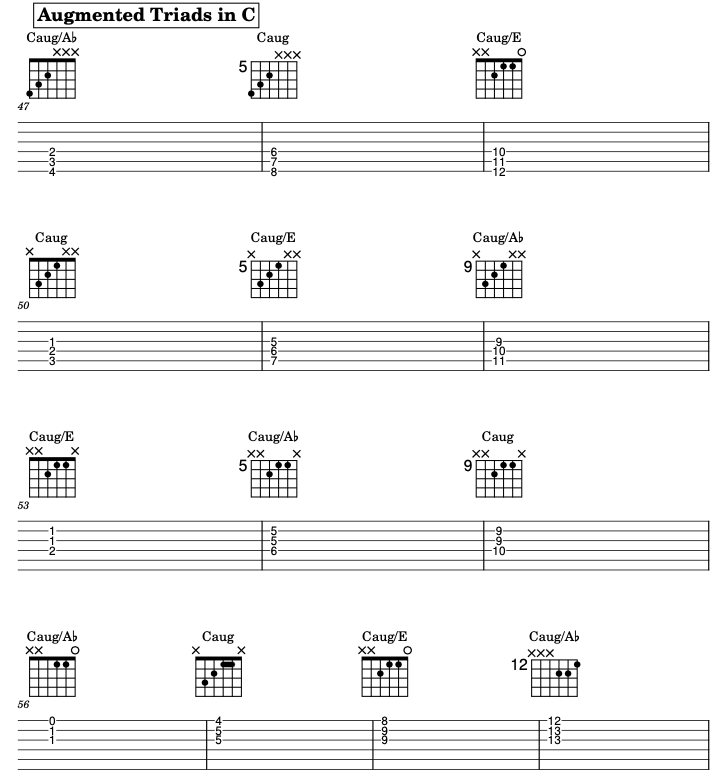
Triads are three-note chords that consist of a root, 3rd, and 5th played on smaller string sets rather than across all six strings. Learning the four main types of triads (major, minor, augmented, diminished) in all inversions (root position, 1st inversion, 2nd inversion) across different string groups unlocks voice leading, where chords connect smoothly with minimal finger movement. Below is how to play the four main triad types in all inversions across the neck in all string sets:
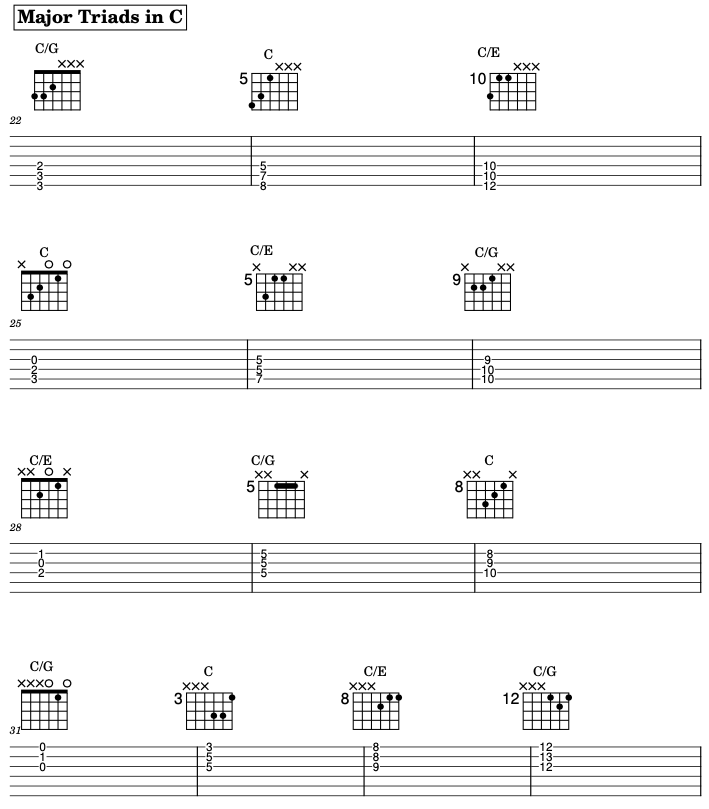
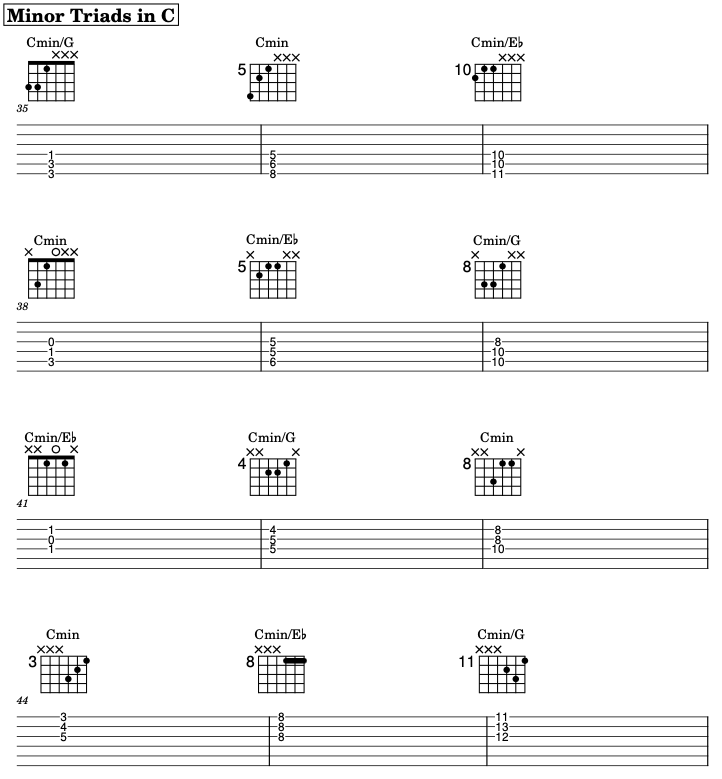
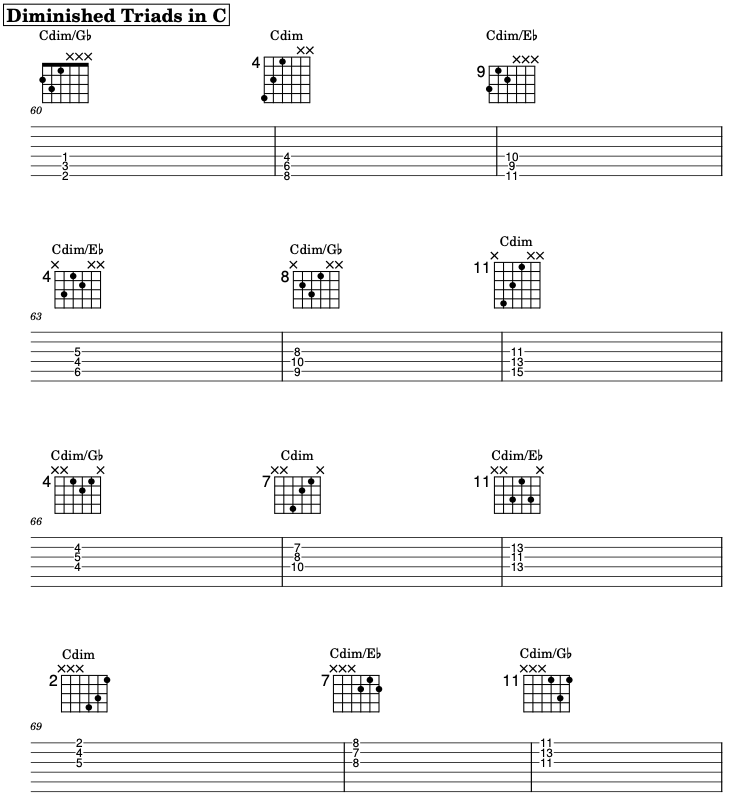
Guitarists like Jimi Hendrix, John Mayer, and John Frusciante use triads to make rhythm parts melodic and interesting rather than just strumming full chords. Combined with hammer-on and pull-off embellishments, triads transform basic chord progressions into something that sounds pianistic and sophisticated.
Fun fact: Augmented triads are symmetrical! You can use the same shapes for Caug for E aug and G#/A♭aug. To put it another way, Caug=Eaug=G#/A♭aug. This also means that you can move the same shape for Eaug on the top three strings up and down major 3rds and still play the same chord, just with different inversions.
Sus and Suspended Chords
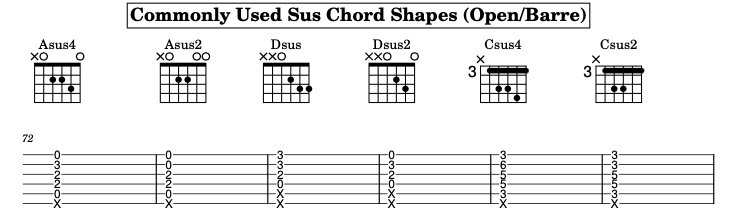
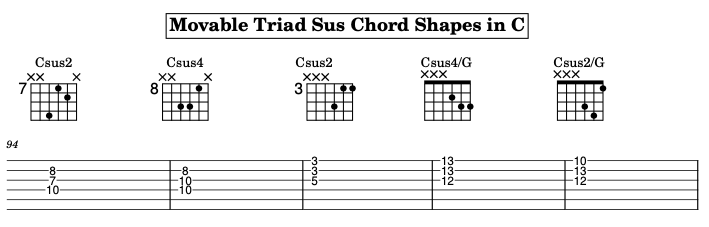
Suspended chords replace the 3rd with either a 2nd (sus2) or 4th (sus4), creating an unresolved, floating quality. They are like power chords in the sense that they’re neither major nor minor. They add tension that typically resolves to a major or minor chord, creating a satisfying sense of movement in your progressions. You can add suspensions to your open chords, barre chords, and triads.
7th Chords (Intermediate)
7th chords add a fourth note to the basic triad to make your chord progressions sound richer and more colorful. The most common types are major 7th (dreamy, smooth), dominant 7th (bluesy, resolved), minor 7th (mellow, jazzy), minor 7♭5, and diminished 7th (tense, dramatic). These chords are essential for blues, jazz, funk, and R&B, but they appear frequently in pop and rock as well. Below are some commonly used 7th chord shapes:
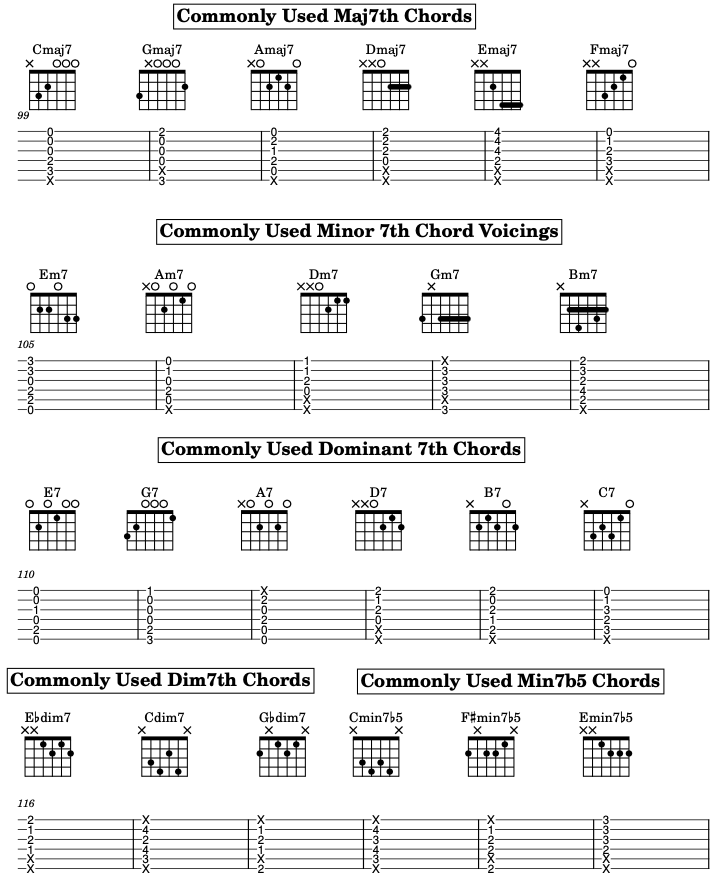
Fun fact: Diminished 7th chords are symmetrical like augmented triads! This means that the same chord voicing for Cdim7 can also be used for Adim7, G♭dim7 (aka F#dim7), and E♭dim7 (aka D#dim7), and vice versa. Also, if you move these diminished 7th chord shapes up or down in minor 3rds, you get different inversions of the same chord, whilst still being able to play the same chord shape.
Advanced 7th Chord Voicings: Shell, Drop 2/3, and Extensions
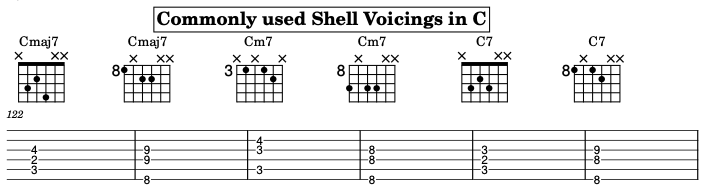
For advanced players, shell voicings strip 7th chords down to their essential tones (root, 3rd, 7th), which are commonly used in jazz, specifically big band, contexts. Below are common shapes in C for Maj7, Min7, and Dominant 7 chord types.
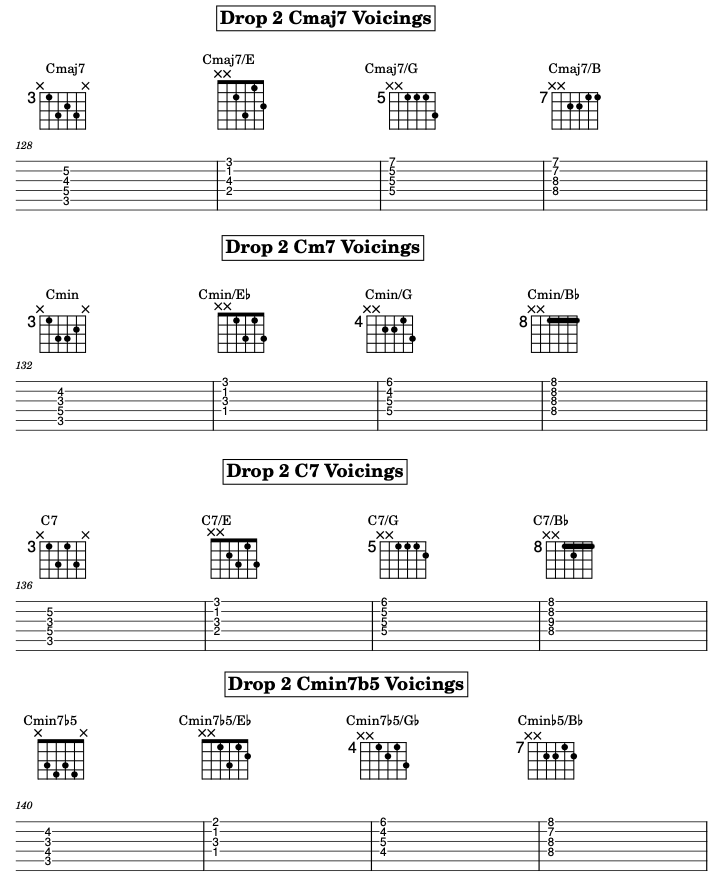
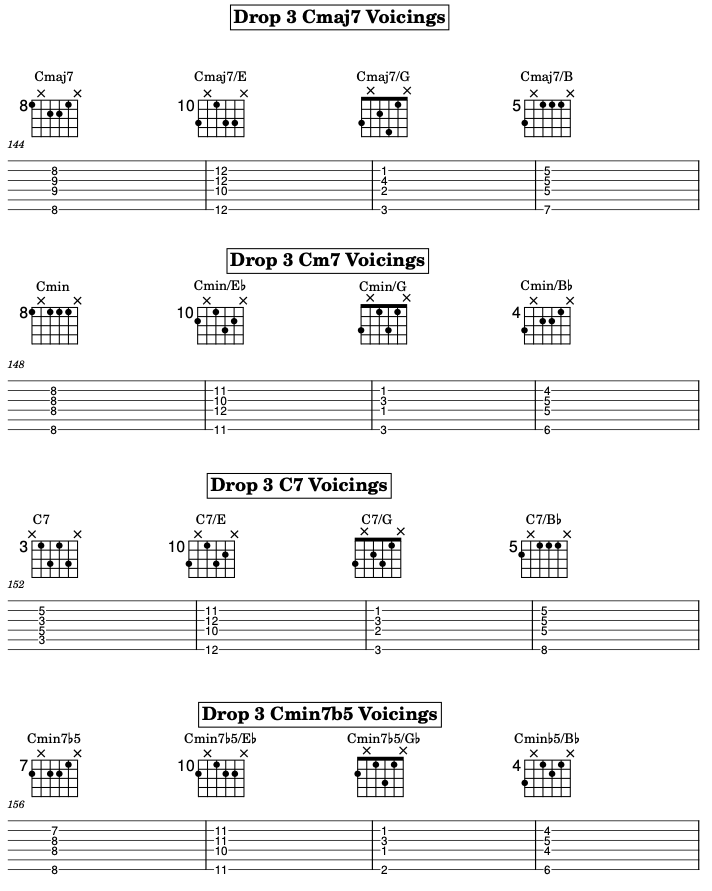
Drop 2 and Drop 3 voicings rearrange chord tones across the fretboard for more open, resonant sounds that are ergonomically practical on guitar. In contrast, closed-position 7th chords that are easily visualized and played on the piano are often awkward to finger on the guitar. Below are some common Drop 2 and Drop 3 voicings for Maj7, Min7, Dominant 7, and Min7♭5 chords.
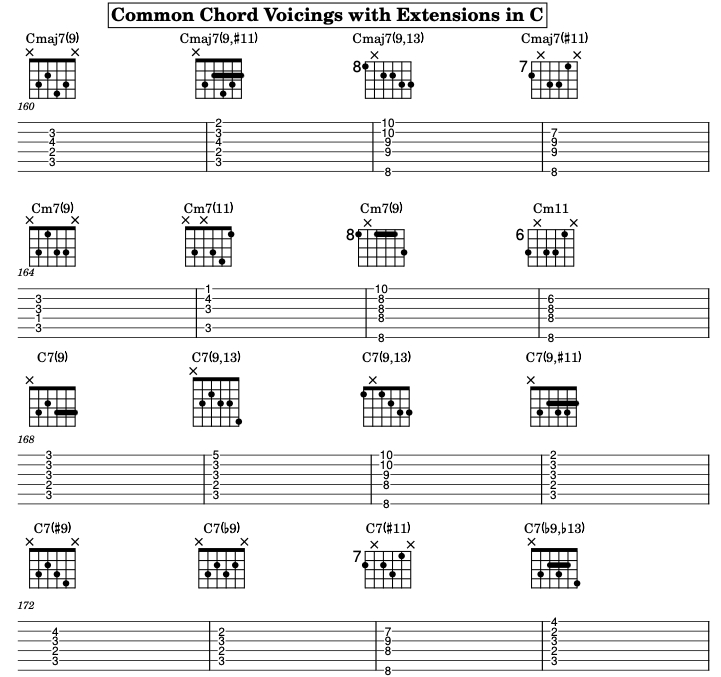
Chord extensions (9ths, 11ths, 13ths) make progressions sound even richer. Songs like “Breathe in the Air” by Pink Floyd, “Purple Rain” by Prince, “For the Love of God” by Steve Vai, “Message in a Bottle”, and “Every Breath You Take” by The Police are famous for their use of extensions. Extensions take scale tones and stack them above 7th chords, creating sophisticated harmony that appears in jazz, funk, and R&B. Below are some common chord voicings with extensions in C:
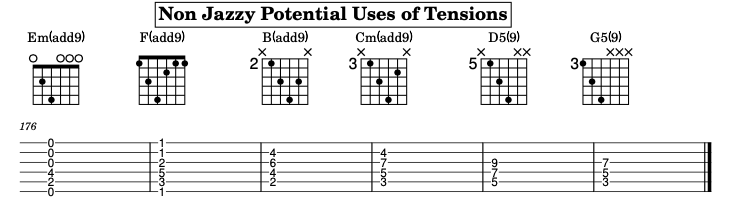
Even in rock contexts, adding a 9th to a power chord, open chord, or barre chord creates a distinctively rich sound that sets your playing apart.
Scales for Rhythm Guitarists
Scales aren’t just for lead guitar. Rhythm guitarists need scale knowledge for fretboard fluency, understanding how chords are constructed, and building riffs and melodic rhythm parts. Our complete scales guide covers each scale in detail. Here’s what matters most for rhythm players.
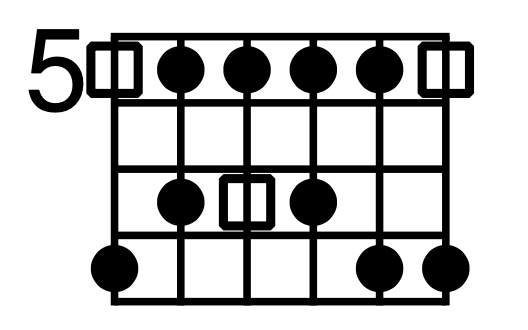
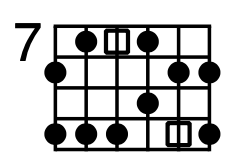
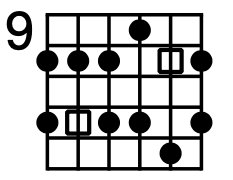
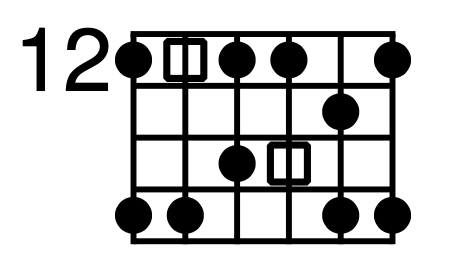
Start with the pentatonic and blues scales because they’re the foundation for riff construction in rock, blues, and pop. The minor pentatonic scale (1, ♭3, 4, 5, ♭7) and blues scale (adding the ♭5) provide the vocabulary behind iconic riffs from “Smoke on the Water” to “Sunshine of Your Love” to “Heartbreaker” Learning these scales in all five positions across the fretboard gives you the raw material for creating your own rhythm parts and riffs.
Minor Pentatonic Scale




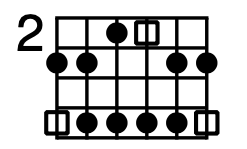

Major Pentatonic
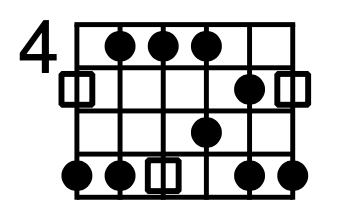

Blues Scale
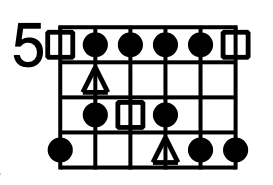

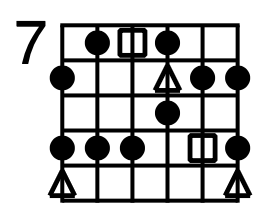

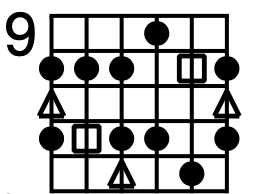

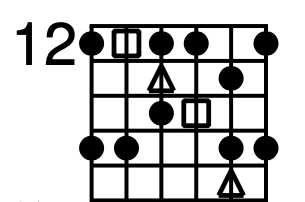

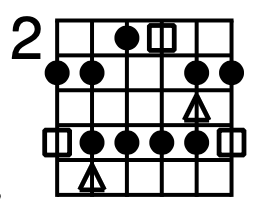

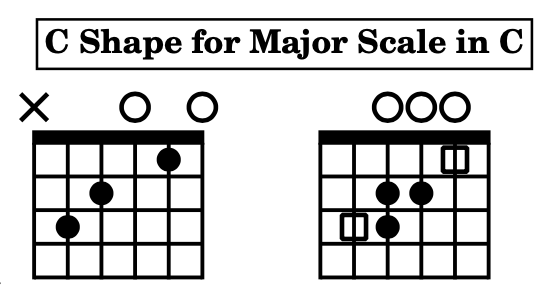
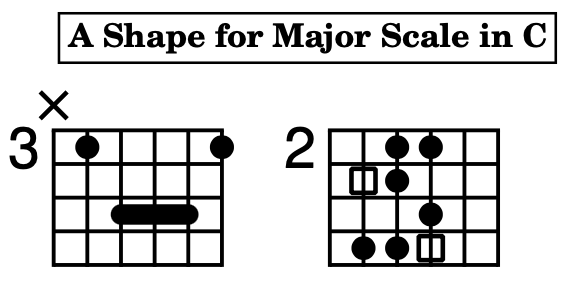
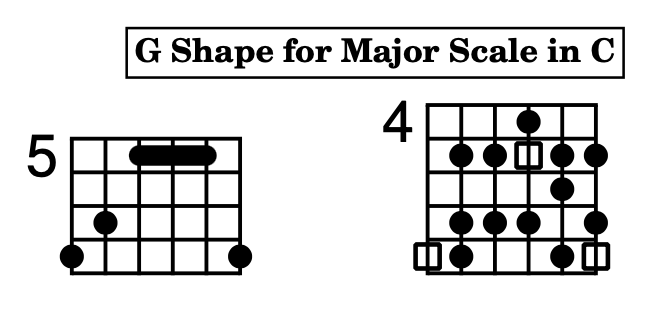
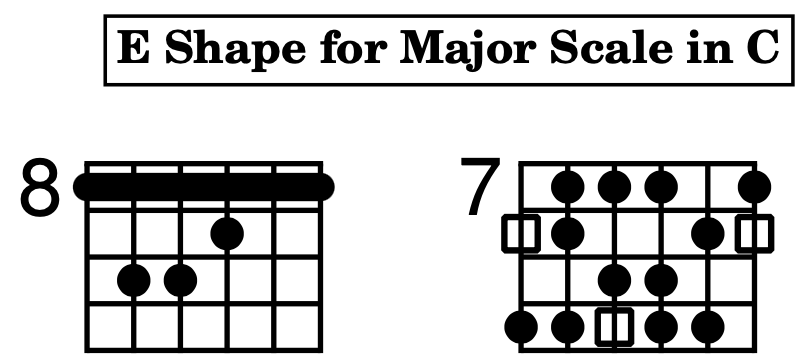
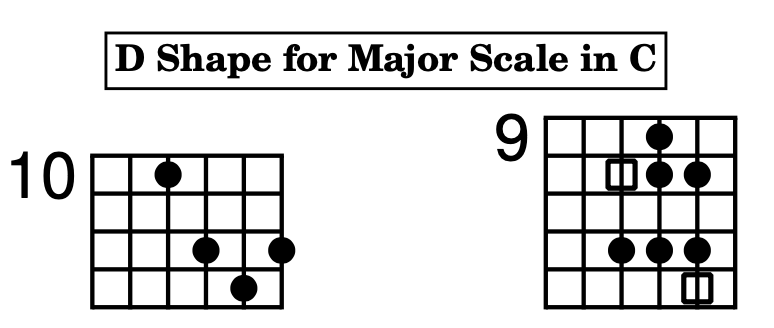
Then learn the major and natural minor scales to understand how chords are built and how keys work. The major scale (1, 2, 3, 4, 5, 6, 7) is the foundational scale of Western music, and understanding it through the CAGED system (As seen below) is particularly valuable for rhythm guitarists because it connects chord shapes to scale shapes across the entire fretboard. When you understand how a G barre chord relates to the G major scale shape in the same position, your chord playing becomes more intentional, and your ability to embellish chords with scale tones improves dramatically.
C Major Scale





A Natural Minor Scale)
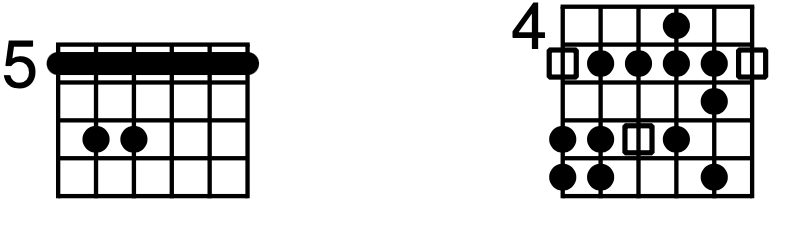

Intermediate players should explore modes, particularly Dorian (groovy minor, heard in “Oye Como Va” and “Uptown Funk”), Mixolydian (bluesy major, heard in “Sweet Child O’ Mine” and “Sweet Home Alabama”), and Lydian (dreamy major, heard in “Dreams” by Fleetwood Mac). Modes open up new textures for chord progressions and riff writing that go beyond simple major and minor. Our modes guide demystifies these with practical listening examples.
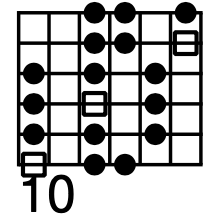

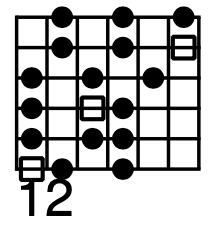

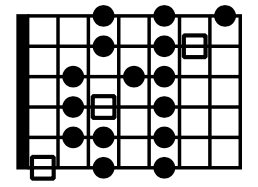

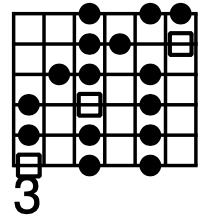

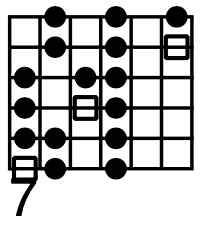

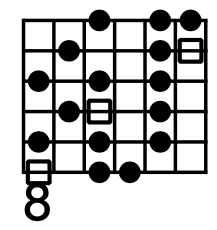
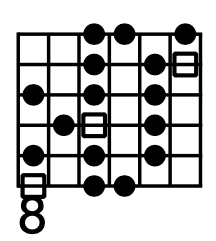
For more advanced players, the harmonic minor scale (with its raised 7th degree creating a darker, more exotic sound) and the melodic minor scale provide additional harmonic and melodic vocabulary. Understanding these scales helps you construct more interesting chord progressions and understand why chord movements, such as the dramatic V-to-i resolution in minor keys, sound the way they do.
C Harmonic Minor

C Melodic Minor

Essential Rhythm Guitar Techniques
Techniques give your rhythm playing texture, dynamics, and personality. They’re the difference between flat, lifeless strumming and a groove that makes people move. Our detailed techniques guide covers each one thoroughly. Here’s the overview.
Strumming
Strumming is the foundational rhythm guitar technique. It’s essentially just sweeping the pick across strings to sound chords. Effective strumming comes from a relaxed wrist motion, not a stiff arm swinging from the elbow. Your wrist should act as a pendulum, moving continuously in a down-up pattern that matches the subdivision of the song. Control volume and tone through three variables: pick angle, pressure, and position relative to the bridge and neck.
The most common strumming mistake is a rigid wrist, which makes everything sound mechanical. The second most common is hitting all six strings when the chord only uses four or five, causing extra strings to ring out. Practice strumming patterns with a metronome before adding syncopation, accents, and muted strums.
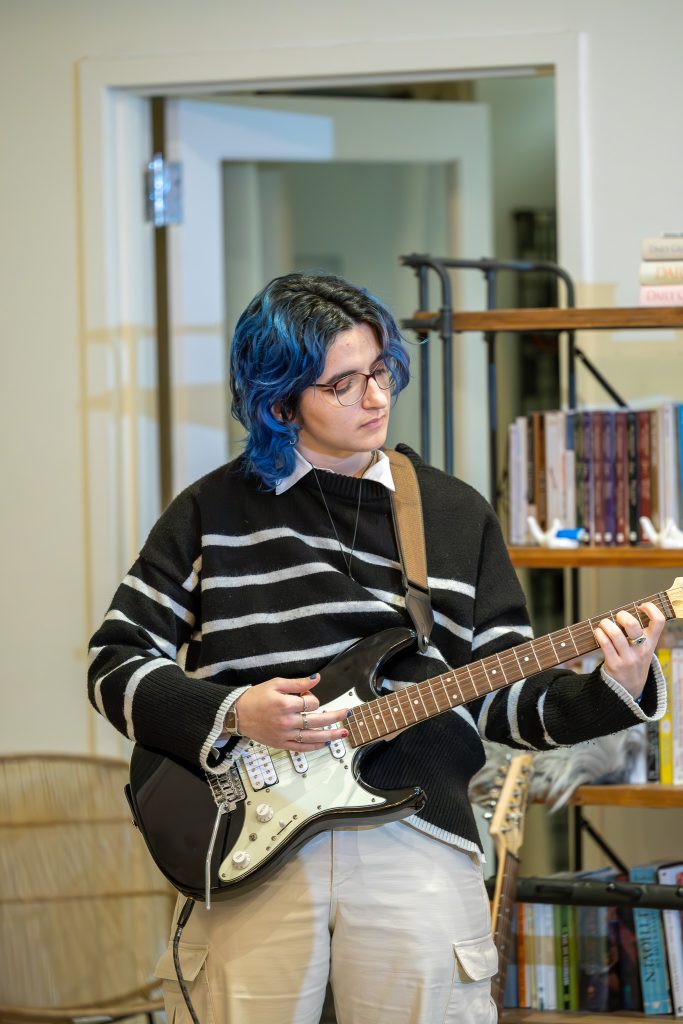
Changing Chords Efficiently
Smooth chord transitions are what make rhythm playing sound continuous rather than choppy. The key principles: identify shared fingers or pivot points between chord shapes and keep those fingers planted while the others move. Move all fingers simultaneously as a unit rather than placing them one at a time. Practice looking away from your fretting hand to build muscle memory rather than visual dependency.
The most common mistakes are lifting all fingers completely off the fretboard between chords (which wastes time) and not practicing transitions in time with a metronome (which masks timing inconsistencies). Isolate your hardest two-chord transitions and loop them until they’re effortless, then reintegrate them into the full song.
Palm Muting
Palm muting involves resting the fleshy edge of your picking hand on the strings near the bridge to dampen them, creating an intense, percussive sound often referred to as a “chug.” It’s fundamental to rock, punk, and metal in songs like “Whole Lotta Love,” “Basket Case,” and “Enter Sandman.” The technique is about finding the sweet spot between too much muting (choked, dead notes) and too little (strings ringing openly). Placement matters too: closer to the bridge produces tighter muting, while slightly further away allows more string vibration for a warmer, less aggressive sound.
The real musicality of palm muting comes from alternating between muted and open passages. Heavy muting during a verse followed by releasing into a ringing, open chorus is one of the most powerful dynamic tools in rock rhythm guitar. Pair it with power chords for the definitive rock and metal rhythm sound.
Fingerpicking (Intermediate)
Fingerpicking replaces the pick with your individual fingers, opening up the ability to play multiple independent musical lines simultaneously. Your thumb handles the bass strings (E, A, D) while your index, middle, and ring fingers handle the treble strings (G, B, E). This technique demands finger independence (each finger must move without affecting the others), which takes dedicated practice but produces a pianistic way of playing guitar.
Songs like “Blackbird” by The Beatles, “Dust in the Wind” by Kansas, and “Tears in Heaven” by Eric Clapton are classic fingerpicking songs that develop independence and control while being deeply satisfying to play. If you also study piano, you’ll find the finger independence skills transfer directly between instruments.
Ghost Notes and Dead Notes
Ghost notes are percussive, muted sounds that add rhythmic texture without producing a specific pitch. They’re rhythmic filler between louder chord hits that transform a basic strum into a groove. To play them, press your fretting hand lightly against the strings (enough to make contact but not enough to fret notes) and strum or pick normally. The result is a short, percussive “chick” sound.
Ghost notes are the foundation of funk rhythm guitar and appear throughout R&B, soul, and groove-based rock. They’re what give songs like “Can’t Stop” by RHCP, “Play That Funky Music” by Wild Cherry, and “Sex Machine” by James Brown their irresistible rhythmic drive. They have been famously used in rock songs like “Creep” by Radiohead and “Smells Like Teen Spirit” by Nirvana.
Hendrix-Style Triad Embellishments (Intermediate)
This technique combines triads on the upper strings with hammer-ons, pull-offs, and pentatonic fills to create rhythm parts that blur the line between rhythm and lead guitar. Instead of strumming static chord shapes, you add melodic movement and ornamentation that makes each chord come alive. Jimi Hendrix pioneered this approach throughout “Little Wing,” “Castles Made of Sand,” and “All Along the Watchtower.” John Mayer’s “Slow Dancing in a Burning Room” and Pearl Jam’s “Yellow Ledbetter” use the same concept.
The key is using compact triad voicings on the D-G-B or G-B-E string sets, which leave other fingers free for embellishments. This is why triads are so important for rhythm guitar development. They’re the gateway to this expressive, sophisticated playing style that makes rhythm guitar sound more interesting and pianistic rather than static.
Fast Downpicking (Metal/Punk)
For metal and punk guitarists, fast downpicking using only downstrokes creates an aggressive, rhythmically tight attack that alternate picking can’t replicate. The consistent downstroke direction produces uniform pick attack and a powerful, driving tone. James Hetfield of Metallica is the benchmark. Songs like “Master of Puppets” and “Creeping Death” demand sustained downpicking at intense tempos.
The motion comes from small, controlled wrist movements with a completely relaxed arm. Gripping the pick too tightly or using large arm movements limits both speed and endurance. Start slow with a metronome and build speed by no more than 5 BPM at a time. Tension is the enemy; relaxation is the key to both speed and stamina.
Songs Every Rhythm Guitarist Should Learn
Learning actual songs is where chords and techniques become real music. Each of these songs teaches specific rhythm guitar skills while being deeply satisfying to play:
“Knockin’ on Heaven’s Door” by Bob Dylan: Simple chord progression that teaches smooth open chord transitions and basic strumming dynamics. Perfect first song for beginners.
“Highway to Hell” by AC/DC: Power chords with groove. Malcolm Young’s rhythm part is a masterclass in tight, driving rhythm guitar with perfect timing.
“Blackbird” by The Beatles: One of the great fingerpicking pieces in popular music. Develops finger independence and teaches how a single guitar can sound like a complete arrangement.
“Under the Bridge” by Red Hot Chili Peppers: Hendrix-style chord embellishments with clean tone. Teaches triads, hammer-ons within chord shapes, and dynamic verse-chorus contrast.
“Master of Puppets” by Metallica: The ultimate fast downpicking workout. Builds speed, endurance, and palm muting precision.
“Little Wing” by Jimi Hendrix: The gold standard for embellished rhythm guitar. Triads, hammer-ons, pull-offs, and pentatonic fills are woven into a chord progression that sounds like a piano.
Playing with Others: Where Rhythm Guitar Comes Alive
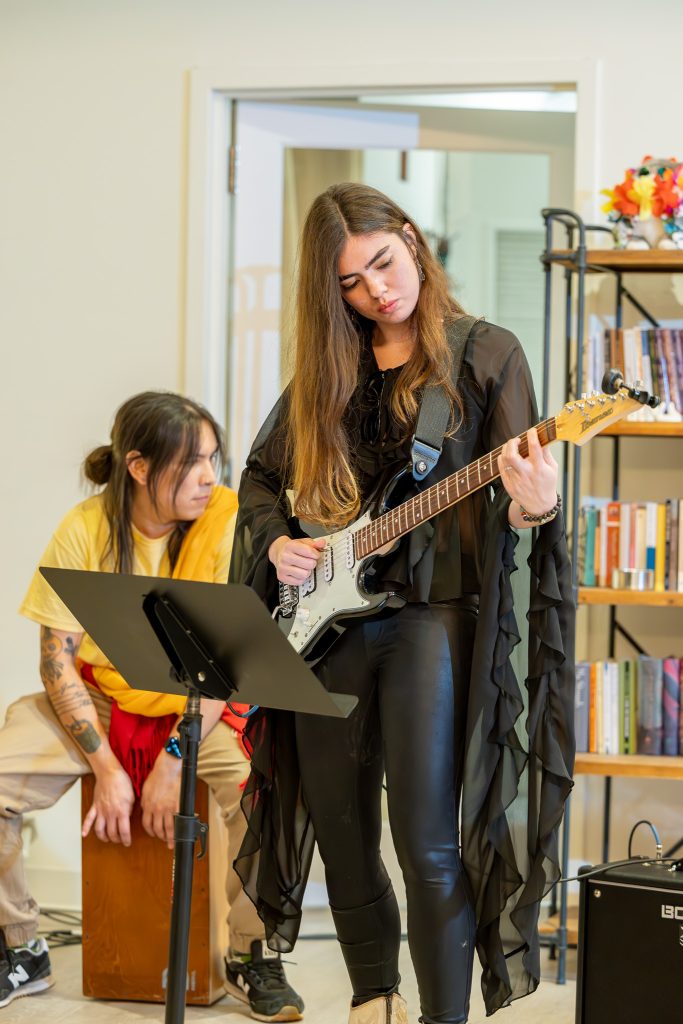
Rhythm guitar exists in the context of a band. You can practice chords and techniques alone, but the real skill of rhythm guitar, listening, supporting, and locking in with other musicians, only develops when you play with other people.
The most important lesson in ensemble playing is learning to support the song rather than showcase yourself. This means paying attention to dynamics (play quietly when the band is quiet), knowing when to play sparsely (especially behind vocals and lead melodies), and understanding that a simple guitar part in the right context can sound incredible even if it wouldn’t sound impressive on its own.
This is exactly why our BAND+ program has been transformative for rhythm guitarists. Playing in a curated band setting with drums, bass, and vocals forces you to develop the listening and dynamic skills that solo practice can’t replicate. It’s where timing, chord knowledge, and technique become real musicianship.
Finding Your Identity as a Rhythm Guitarist
Great rhythm guitarists are irreplaceable. They hold songs together, make singers sound better, and lock in with the drummer in a way that makes the entire band feel relaxed and confident. Your identity as a rhythm guitarist comes from how you place notes, control dynamics, listen, and leave space.
Two guitarists can play the same chord progression and sound completely different. One might be driving and aggressive. Another might be sparse and supportive. A third might be percussive and funky. Your identity lives in your timing, your feel, and your touch, which are subtle qualities that develop through years of listening and playing.
Being a rhythm guitarist isn’t about being in the background. It’s about being the glue that holds the music together. And the best rhythm players know that serving the song is the highest form of musicianship.
Practice Strategy for Working Professionals
If you’re balancing guitar practice with a career, here’s a realistic framework:
Months 1-3: Open chords and basic strumming patterns. Focus on clean chord changes in time with a metronome. Learn 3-5 songs you love using open chords. Develop palm muting basics.
Months 4-6: Barre chords and power chords. Begin fingerpicking if interested. Start playing along with recordings to develop your internal clock and groove feel.
Months 7-12: Triads and inversions. Sus chords and basic 7th chords. Ghost notes and dynamic control. Begin playing with other musicians whenever possible.
Year 2+: Advanced voicings (shell, drop 2/3, extensions). Hendrix-style embellishments. Modal awareness for riff writing. Regular ensemble playing.
Twenty minutes of focused daily practice with a metronome produces better results than sporadic hour-long sessions. Consistency is everything in rhythm guitar development.
Getting Started with Expert Guidance
At Musicians Playground, our working Boston guitarists specialize in teaching adults. We understand that you want real results in a realistic timeframe, and we build lessons around your goals, schedule, and the music you love.
We’re located at 33 West Street in Boston’s Downtown Crossing, and we offer a $100 Intro Week that applies toward membership. Whether you’re learning your first open chords or diving into jazz voicings, our instructors will meet you where you are. It’s never too late to become the rhythm guitarist every band wants.
Frequently Asked Questions
Is rhythm guitar easier than lead guitar?
Neither is inherently easier because each demands different skills. Rhythm guitar requires precise timing, chord fluency, and dynamic control, while lead guitar focuses on scales, techniques, and melodic expression. Advanced rhythm playing (funk, jazz, progressive rock) is extremely challenging. Read our full comparison for more detail.
How long does it take to learn rhythm guitar?
Most adult learners can play simple songs with open chords within 1-2 months. Developing confident rhythm skills with barre chords and basic techniques typically takes 6-12 months. Advanced rhythm playing, through complex voicings, dynamic control, and ensemble skills, deepens over years of practice and performance.
Do I need to learn scales if I only want to play rhythm guitar?
Yes. Scales help you understand how chords are built, how keys work, and how to construct riffs and rhythm parts. You don’t need to learn scales for soloing purposes, but scale knowledge makes your rhythm playing more intentional and versatile.
What songs should I learn first for rhythm guitar?
Start with songs that use 3-4 open chords at a moderate tempo. Classics like “Knockin’ on Heaven’s Door,” “Horse With No Name,” “Wonderful Tonight,” “Sweet Home Alabama,” and “Brown Eyed Girl” are approachable and teach essential chord change and strumming skills.
Can I play rhythm and lead guitar?
Absolutely. Most professional guitarists develop both skill sets. Understanding rhythm makes your lead playing more musical, and lead knowledge makes your rhythm parts more creative. Many guitarists, such as Hendrix, Mayer, and Frusciante, are famous for seamlessly blending both roles.