
Barre Chords: A Guide for Adult Guitarists
Updated March 31, 2026
If there’s one technique that makes beginning guitarists want to quit, it’s barre chords. Your hand cramps. The strings buzz. Half the notes are muted. And everyone tells you to “just practice more.” But the problem usually isn’t practice, it’s technique. With the right adjustments, barre chords go from painful to manageable in weeks, not months.
This guide addresses the specific problems adult learners face with barre chords and provides the technical fixes that make the biggest difference fastest. For how barre chords fit into your overall chord vocabulary, see our complete guitar chords guide and our Ultimate Guide to Rhythm Guitar.
What Barre Chords Are and Why They Matter
A barre chord uses your fingers to press across most strings at a single fret, while your remaining fingers form a chord shape behind it. Your index finger essentially acts as a movable capo, transposing open chord shapes to any position on the neck.
This is what makes barre chords so valuable: learn four shapes (E major, E minor, A major, A minor), and you can play any major or minor chord in any key. That’s 48 chords from four shapes. They free you from an open position entirely and open up the entire fretboard for your rhythm guitar playing.
The Four Essential Barre Chord Shapes
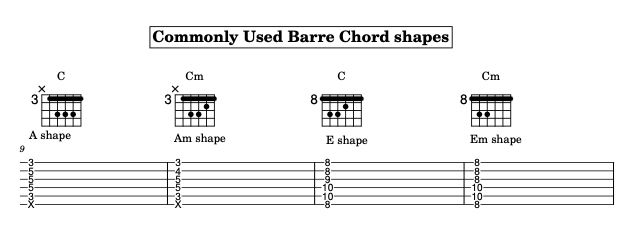
E-shape barre (root on 6th string): This is the most common barre chord. Your index finger barres across all strings while fingers 2, 3, and 4 form the E major shape. Move this shape to the 3rd fret, and you have G major. Move it to the 5th fret for A major. The minor version simply lifts your middle finger (finger 2), identical to the relationship between E major and E minor in open position.
A-shape barre (root on 5th string): Your index finger barres while fingers 2, 3, and 4 (or a partial barre with finger 3) form the A major shape. This shape gives you access to chords higher up the neck with a different voicing than the E-shape. The minor version adjusts the same way Am differs from A in open position.
While there are also C, G, and D-shape barre chords, they’re significantly harder to play and less practical for quick transitions. Master the E and A shapes first because they cover everything you need for the vast majority of songs. Below are diagrams for these essential barre chord shapes:
Fixing the Most Common Problems
Problem: Pain and Hand Fatigue
If your hand cramps after 30 seconds of barre chords, the issue is almost always technique, not weakness. Here are the adjustments that make the biggest difference:
Roll your index finger slightly. Don’t press with the flat, fleshy pad. Roll it slightly toward the nut (the headstock side) so the harder, bonier edge of your finger contacts the strings. This requires significantly less pressure to produce clean notes.
Reposition your thumb. Place it in the center of the neck’s back, directly behind your index finger, not wrapped over the top. This creates a natural clamp between thumb and index that uses structural leverage rather than raw squeezing force.
Bring your elbow in. Tuck your fretting arm’s elbow toward your rib cage. This angles your hand parallel to the frets and gives your fingers better access to the strings without excessive stretching or twisting.
Use arm pull, not finger squeeze. Instead of pinching between your thumb and fingers, gently pull back with your entire arm. This engages larger muscles and dramatically reduces finger fatigue.
Problem: Buzzing Strings
Index finger too far from the fret. If your barre sits in the middle of the fret space, you need significantly more pressure to produce clean notes. Move your index finger close to the fret wire (on the side toward the bridge). Less pressure, cleaner sound.
Other fingers are touching adjacent strings. Check that your remaining fingers are curled and arched enough that only their tips contact the strings. Flat fingers are the most common cause of accidentally muted adjacent strings.
Uneven pressure across the barre. Your index finger doesn’t need to press every string equally hard. The strings under your other fingers are already fretted. Focus your barre pressure on the strings that only the index finger covers, typically the 1st, 2nd, and 6th strings in an E-shape barre.
Problem: Slow Transitions
Transitioning to and from barre chords quickly is the final hurdle. These strategies help:
Visualize the shape before you move. Know exactly where every finger goes before you lift your hand. Mental preparation eliminates the fumbling that happens when you move first and figure out finger placement on the fly.
Move as a unit. All fingers should arrive at the new chord simultaneously, not one at a time. Practice forming the full barre chord shape in the air (off the fretboard) and then placing it down as a complete unit.
Find pivot points. When transitioning between two specific chords, identify any fingers that can stay in place or slide along a string. These anchor points reduce the total movement required.
Why a Capo Isn’t a Long-Term Solution
A capo is a useful tool because it lets you transpose songs while using open chord shapes. But if you use a capo to avoid barre chords entirely, it becomes a crutch that limits your development. You’ll always be restricted to the key, and voicing the capo prevents you from being able to play freely up and down the neck.
Learn barre chords, then use a capo when it genuinely serves the music (certain songs sound best with the bright, ringing quality of open chords in a capo’d position). That’s using a capo as a tool. Avoiding barre chords by always reaching for the capo is letting a limitation dictate your playing.
A Realistic Practice Plan
Week 1-2: Practice forming the E-shape major barre chord at the 5th fret (A major). Hold it for 10 seconds, release, shake out your hand, repeat. Do this 5-10 times per practice session. Focus entirely on clean sound from every string. Strum slowly and check each string individually.
Week 3-4: Begin transitioning between an open chord and the barre chord. Example: open G to barre A (5th fret). Use a metronome at a very slow tempo (40-50 BPM) and give yourself a full measure to make the change.
Month 2: Add the E-shape minor barre and begin transitioning between barre chords (e.g., barre F to barre G). Start learning the A-shape barre chord.
Month 3: Play full songs that require barre chords. Start at slower tempos and gradually work up to the original speed. Songs like “Creep” by Radiohead and “Hotel California” by the Eagles are excellent barre chord workouts.
Practice barre chords in short sessions (5-10 minutes) rather than marathon sessions. Hand fatigue leads to poor technique, which leads to bad habits. Short, focused sessions build strength and technique simultaneously.
If you’re struggling with barre chords and want hands-on guidance, our guitar instructors at Musicians Playground can identify your specific technique issues in minutes and provide targeted fixes. Small adjustments to hand position make an enormous difference, and they’re much easier to implement with an instructor watching your form in real time. Visit our complete guide to guitar lessons in Boston to get started. It’s never too late to conquer barre chords.

Frequently Asked Questions
How long does it take to learn barre chords?
Most adult learners can play clean, static barre chords within 3-4 weeks of daily practice. Smooth transitions between barre chords at tempo typically take 2-3 months. The timeline shortens significantly with proper technique instruction, because most of the initial struggle comes from technique issues rather than a lack of strength.
Are barre chords harder for people with small hands?
Hand size has far less impact than technique. Players with smaller hands may need to make slightly larger adjustments to thumb and elbow position, but every hand size can play barre chords effectively. If hand size were a real barrier, most female classical guitarists wouldn’t exist. Many of them are exceptional.
Should I learn barre chords on an acoustic or electric guitar?
An electric guitar is easier for learning barre chords because of lower string action and lighter gauge strings. If you only have an acoustic, consider having it professionally set up to lower the action as much as possible. Once your technique is solid on acoustic, electric barre chords will feel effortless.
My index finger joint collapses when I barre. How do I fix this?
Lock your index finger slightly, not rigidly straight, but firm enough that the joints don’t buckle under pressure. Rolling the finger onto its bony side helps because the bone provides structural support that soft tissue doesn’t. If your joints are hypermobile, a slightly higher barre position (closer to the nut where there’s less string tension) can help while you build strength.