
The Ultimate Guide to Lead Guitar for Adults
Updated August 8, 2026
You’ve heard a solo cut through a song and felt something shift inside you. Maybe it was Gilmour’s bends on “Comfortably Numb,” Hendrix’s raw electricity on “Hey Joe,” or a moment at a live show where the guitarist stepped forward, and the whole room held its breath. That feeling, the one that made you think “I want to do that,” is the reason lead guitar exists.
This guide is your complete roadmap. Whether you’re an adult learner picking up lead guitar for the first time or an intermediate player looking to break through a plateau, everything you need is here: the foundations that matter most, the scales that unlock the fretboard, the techniques that give your playing a voice, and the practice strategies that fit a working professional’s schedule.

This guide was developed by the working Boston musicians at Musicians Playground in Boston, drawing from years of experience teaching adult students. It’s the same curriculum framework we use in our private lessons, adapted here so you can start building real skills today.
Foundations of Lead Guitar
Before scales and techniques, lead guitar rests on foundational skills that determine whether your playing sounds musical or mechanical. These aren’t glamorous, but skipping them is the single most common reason guitarists plateau. If you’re just starting your lead guitar journey, these foundations deserve your full attention first.
What Is Lead Guitar?
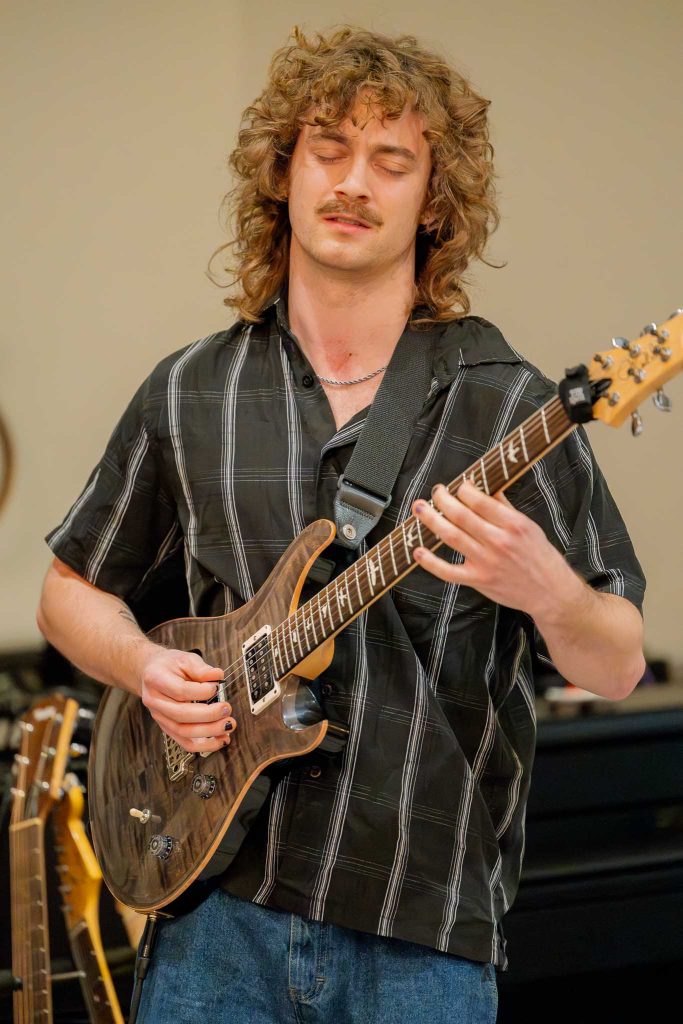
Lead guitar is the melodic voice of a band. While rhythm guitar provides the harmonic foundation through chords and riffs, lead guitar sits on top of that foundation and tells a story through solos, melodies, and improvisation. It’s the part people hum after the song ends. It’s the moment in a performance that makes an audience lean forward.
Here’s what most people get wrong about lead guitar: they think it’s about speed. It isn’t. Some of the most celebrated guitarists in history, such as David Gilmour and B.B. King, are known for saying more with fewer notes. Technical speed is one tool among many. Expression, phrasing, and taste are what separate a guitarist who plays fast from a guitarist who plays music.
Think of lead guitar like speaking. A great speaker doesn’t talk as fast as possible. They pause for effect. They emphasize the right words. They know when silence communicates more than another sentence. That’s exactly how great lead guitarists approach their instrument.
Timing and Phrasing
Great lead guitar starts with rhythm. Even the most beautiful phrase falls flat if it rushes or drags against the beat. Strong lead players place their notes intentionally, feeling rhythm deeply and using space as deliberately as sound.
Phrasing is how you organize notes into musical sentences. Good phrasing involves call and response, playing a musical question and then answering it. It involves repetition with variation, strong beginnings and endings, dynamics and articulation, and most importantly, space and silence. The pauses between your phrases are just as important as the notes within them.
Practice playing along with backing tracks and focus on when you place notes before worrying about which notes you play. A simple phrase played with perfect timing sounds infinitely better than a complex phrase played sloppily.
Hand Synchronization
Your fretting hand and picking hand must work as one coordinated unit. Unsynchronized hands are the root cause of sloppy lead playing at every level. The fix is unglamorous but effective: practice slowly with a metronome. If you can play something cleanly at 60 BPM, speed will follow. If you can’t play it cleanly, slow playing it fast only ingrains bad habits.
Fretboard Awareness
You don’t need to memorize every note on the fretboard instantly, but you do need to develop orientation, understanding where you are and how shapes connect across the neck. Confidence comes from knowing your surroundings, not from memorizing every street name in a city. As you progress through scales and positions, this awareness builds naturally and becomes one of your greatest assets as an improviser.
Touch and Control
How hard you press the strings, how you strike with the pick, and how you release notes all matter more than speed. Touch is what gives your playing dynamics, the difference between a whisper and a shout, between tension and release. Developing sensitivity in your hands transforms your guitar from an instrument you operate into an instrument you play expressively.
Essential Scales for Lead Guitar
Scales are the vocabulary of lead guitar. Learning them gives you the notes that work over any chord progression, and practicing them develops your fretboard fluency. But not all scales are equally important, and the order you learn them matters enormously. Our complete guide to guitar scales for soloing covers each scale in depth. Here’s the overview and the learning sequence that gets you soloing musically as quickly as possible.
Minor Pentatonic Scale (Learn First)
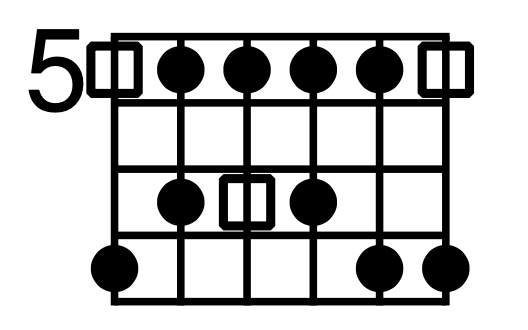
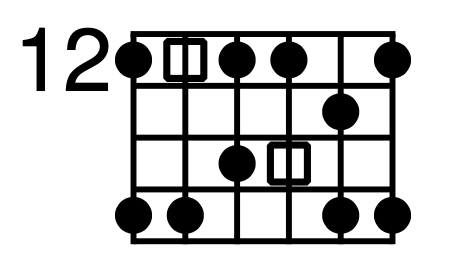
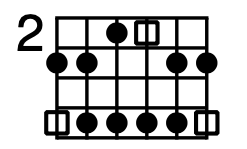
The minor pentatonic is where every lead guitarist begins. Its five notes (1, ♭3, 4, 5, ♭7) sound great over blues, rock, pop, funk, and virtually any minor key progression. Countless iconic solos, such as “Stairway to Heaven” and “Hey Joe,” are built primarily from this one scale.
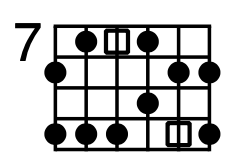
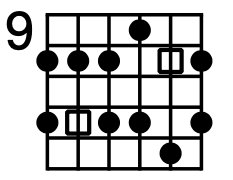
Start with the first position in A minor (starting at the 5th fret), then gradually learn all five positions across the fretboard. Knowing all five positions gives you the freedom to solo anywhere on the neck, not just in one box shape. Practice with backing tracks from day one so you develop musicality alongside technical fluency. Below are all 5 positions of the A minor pentatonic scale in the order you should learn them:





Blues Scale
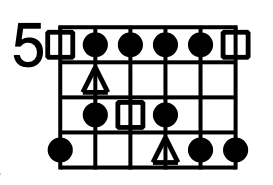
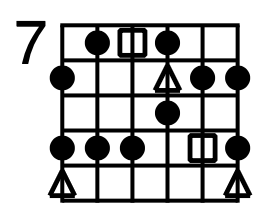
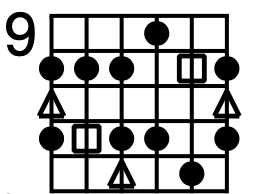
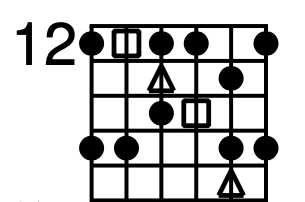
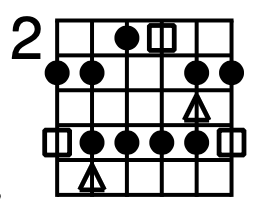
The blues scale adds an extra note to the minor pentatonic. This is the♭5, known as the “blue note.” This one addition creates the tension-and-release quality that defines blues guitar. Use the ♭5 as a passing tone by sliding through it, but don’t rest on it. It’s a spice, not a main ingredient, that can be used to make your solos more interesting. Below are all 5 positions of the Blues Scale in A minor:





Major Pentatonic Scale
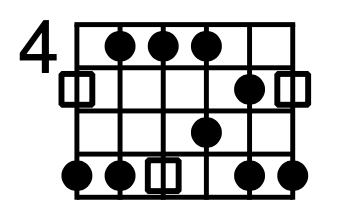
Where the minor pentatonic sounds dark and bluesy, the major pentatonic sounds bright and uplifting. Its notes are 1, 2, 3, 5, and 6. A useful shortcut: the major pentatonic uses the same shapes as the minor pentatonic, just rooted three frets lower. Many blues guitarists blend minor and major pentatonic scales over the same progression for tonal variety that keeps solos interesting. Below is how to play the A major pentatonic scale:

Major and Natural Minor Scales
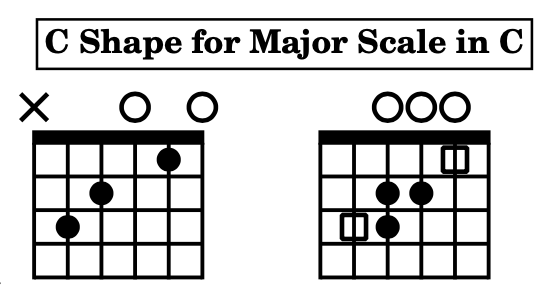
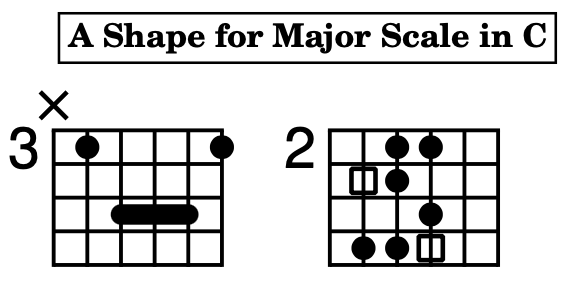
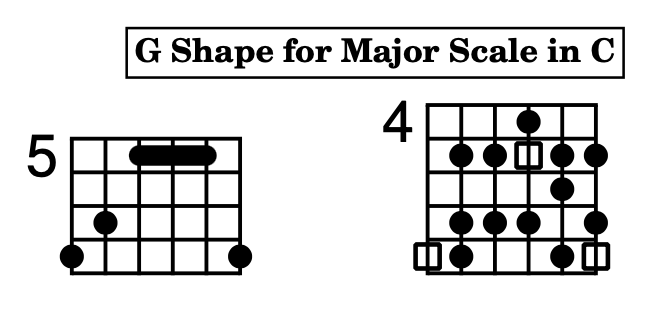
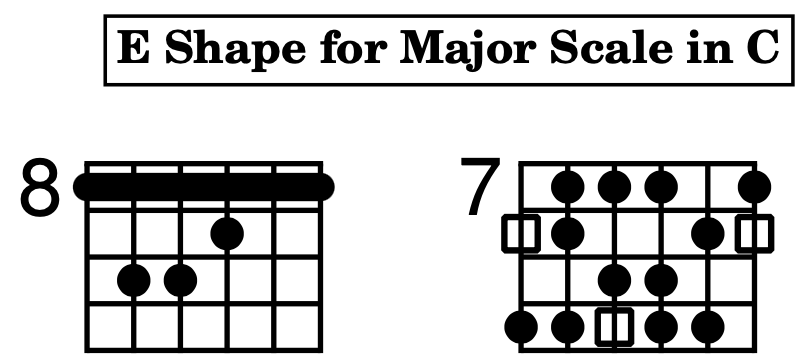
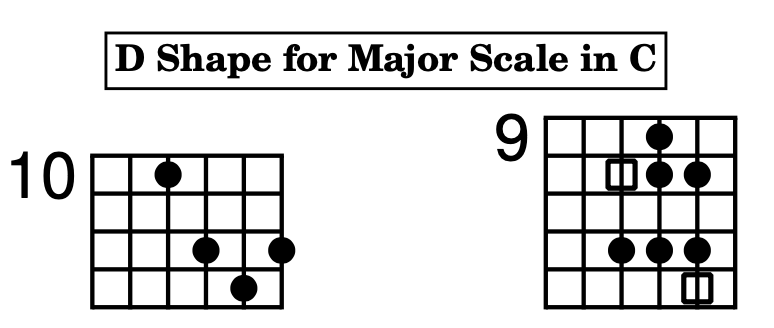
The full seven-note major scale (1, 2, 3, 4, 5, 6, 7) and natural minor scale (1, 2, ♭3, 4, 5, ♭6, ♭7) expand your melodic possibilities beyond the pentatonic framework. Learning the major scale through the CAGED system is particularly effective for guitarists because it connects scale shapes to chord shapes, deepening your understanding of both.
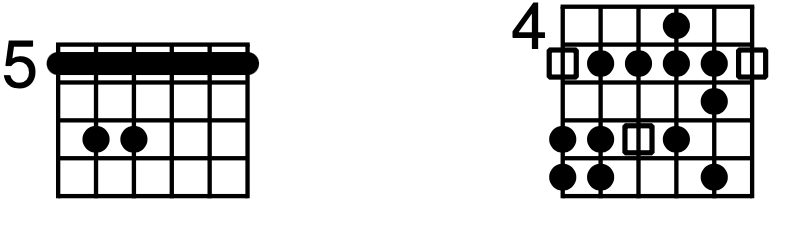
The natural minor uses the same notes as the major scale but starts from a different root. Both the C major and A minor scales share every note. Understanding this relationship between relative major and minor keys is fundamental to navigating the fretboard intelligently.
C Major Scale (CAGED System)





A Natural Minor Scale
Harmonic and Melodic Minor Scales (Intermediate)
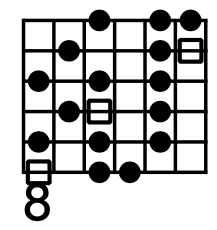
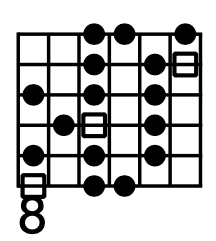
The harmonic minor raises the 7th degree of the natural minor (1, 2, ♭3, 4, 5, ♭6, 7), creating a darker, more exotic sound with a strong pull toward resolution. Yngwie Malmsteen built his entire signature around this scale. The melodic minor raises both the 6th and 7th degrees, smoothing out the harmonic minor’s distinctive augmented 2nd interval for more fluid melodic lines.
These aren’t beginner scales, but intermediate players who want to expand their tonal palette should study both. Below is how to play each scale in C:
C Harmonic Minor

C Melodic Minor

Modes of the Major Scale (Intermediate)
Modes are seven scales derived from each degree of the major scale. Each has a unique emotional character that goes beyond simple “happy” or “sad.” Our complete guide to guitar modes demystifies them with practical listening examples. Here’s the essential overview:
Dorian
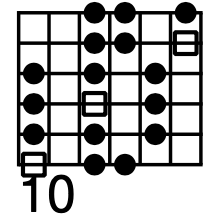
(1, 2, ♭3, 4, 5, 6, ♭7): Minor with a groovy, funky quality. It can be heard in “Oye Como Va” by Santana and “Uptown Funk” by Bruno Mars. This is the most useful mode to learn first after the standard major and minor scales. Below is how to play D Dorian:

Phrygian
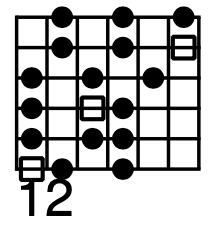
(1, ♭2, ♭3, 4, 5, ♭6, ♭7): Dark and aggressive, frequently used in metal. Metallica’s “Wherever I May Roam” and Megadeth’s “Symphony of Destruction” are excellent examples of this. Below is how to play E Phrygian:

Lydian
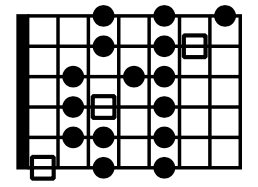
(1, 2, 3, #4, 5, 6, 7): Dreamy and ethereal, the brightest mode. “Flying in a Blue Dream” by Joe Satriani and “Dreams” by Fleetwood Mac are famous examples of this. Below is how to play F Lydian:

Mixolydian
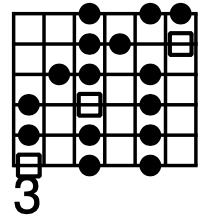
(1, 2, 3, 4, 5, 6, ♭7): Major with a bluesy edge. Classic rock songs like “Sweet Child O’ Mine,” “Sweet Home Alabama,” and “Hey Jude” are excellent examples of this. Below is how to play G mixolydian:

Locrian
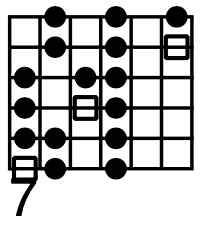

(1, ♭2, ♭3, 4, ♭5, ♭6, ♭7): Unstable and dissonant due to its ♭5. Used sparingly, primarily in metal to convey an evil texture. The main riff for “Painkiller” by Judas Priest is a great example of Locrian in practice.
Don’t try to learn all seven modes at once. Master Dorian and Mixolydian first because they cover the most musical ground and are the most immediately useful for rock and pop improvisation.
Basic Techniques Every Lead Guitarist Needs
Scales give you the notes. Techniques give you the voice. Without these fundamental techniques, your solos will sound like exercises. With them, the same notes become expressive, dynamic, and musical. Our detailed technique guide covers each one thoroughly. Here’s what you need to know.
Slides
A slide connects two notes by maintaining finger pressure while moving along the string. It’s the simplest technique to learn and immediately makes your playing sound fluid and connected. Practice sliding in both directions and focus on maintaining even pressure throughout the motion. The most common mistake is losing pressure during downward slides, which kills the note before reaching the target fret.
Hammer-Ons and Pull-Offs
These are the foundation of legato playing, a smooth, connected style that makes lead lines sound vocal rather than percussive. A hammer-on sounds a higher note by striking the fretboard with a fretting-hand finger. A pull-off sounds a lower note by plucking the string with a fretting finger as it lifts off. Together, they allow you to play multiple notes from a single pick stroke. Our complete legato guide covers the progression from basic exercises to advanced applications.
Train each finger individually. Most players develop strong hammer-ons with index and middle fingers but neglect the ring and pinky, creating uneven legato lines.
Bending
Bending is the closest a guitar comes to the human voice and is the primary way you develop your personal sound on the instrument. Push a string sideways to raise its pitch, typically a half step (one fret) or whole step (two frets). The critical mechanic: use your wrist to power the bend, not just your fingers. Support the bending finger with the fingers behind it for strength and control.
Bending accuracy matters enormously. A bend that falls short of the target pitch sounds hesitant. One that overshoots sounds wrong. Practice by playing the target note first, then matching it with a bend from one or two frets below. Repeat until your muscle memory is reliable.
Vibrato
Vibrato is the rhythmic oscillation of a note’s pitch that gives sustained notes life and warmth. It’s the mark of a mature player; you can identify most great guitarists by their vibrato alone. The motion comes from wrist rotation, not a nervous finger shake. Practice slow, controlled vibrato first, focusing on consistent width and even rhythm before adding speed.
Vibrato on a bent note (bend to pitch, then add vibrato while holding the bend) is one of the most expressive sounds in guitar. It requires significant hand strength and control, but the payoff is enormous.
Double Stops
Playing two notes simultaneously on adjacent strings adds harmonic depth to your lead lines. Double stops bridge the gap between lead and rhythm playing and become especially powerful when combined with bending, vibrato, and slides. Chuck Berry, Jimi Hendrix, and Stevie Ray Vaughan built iconic licks around this technique.
Alternate Picking
A strict down-up-down-up picking pattern that’s foundational for building speed, maintaining rhythm, and reducing hand fatigue. Start on a single string at a slow tempo, make your downstrokes and upstrokes identical in volume, and gradually apply alternate picking to your scale practice. The motion should originate from the wrist with minimal movement. Efficiency creates speed, not force.
Intermediate and Advanced Techniques
Once the fundamentals are solid, these techniques expand your technical range for more demanding musical situations.
Tapping
Tapping uses your picking hand to hammer-on and pull-off notes on the fretboard, creating rapid arpeggios and wide intervallic leaps that would be impossible with the fretting hand alone. Eddie Van Halen popularized this technique, and it gives your playing a keyboard-like quality with impressive visual flair. Start with simple three-note patterns using one tapping finger before exploring multi-finger tapping.
Tremolo Picking
Very fast alternate picking on a single string, tremolo picking builds speed, endurance, and relaxation at high tempos. The motion comes from the wrist, not the forearm. Start with short bursts on an open string, gradually increasing the duration and tempo. This technique appears in everything from surf rock to metal.
Economy Picking
Economy picking maximizes efficiency by using the same pick direction when crossing to adjacent strings (down-down when ascending, up-up when descending), unlike alternate picking, which reverses direction on every note. Combined with three-note-per-string (3NPS) scale shapes, economy picking is foundational for developing high speed. Players like Frank Gambale and Yngwie Malmsteen rely on it heavily.
Sweep Picking
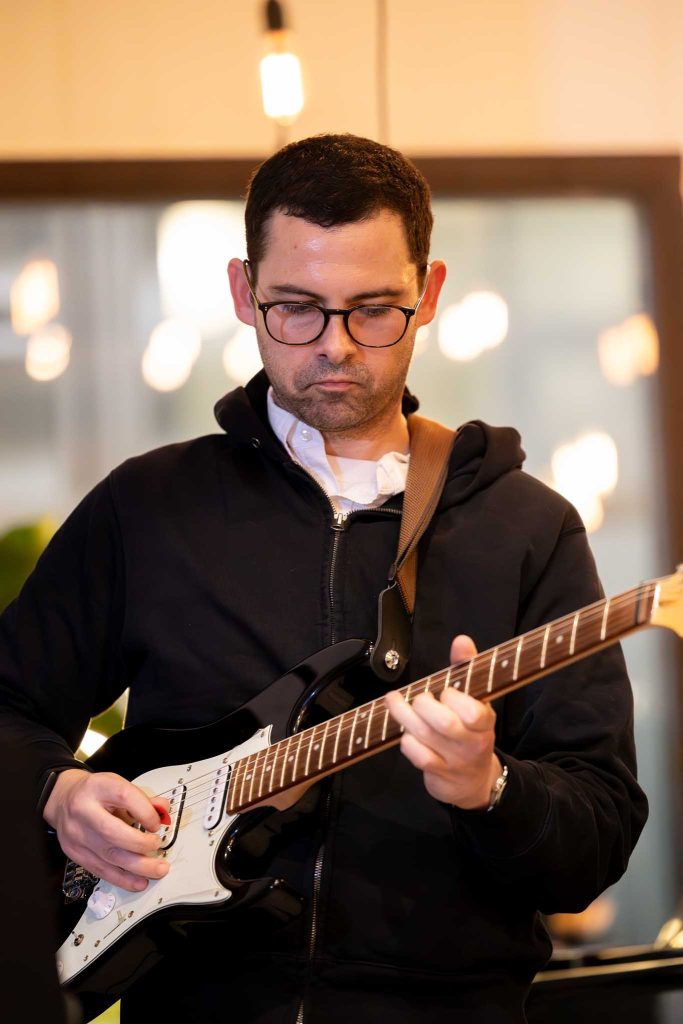
Sweep picking uses a brush-like motion across consecutive strings to play fast arpeggios with fluid efficiency. The pick “falls” through the strings with a controlled motion while the fretting hand rolls across each string, muting each note as the next one sounds. Start with three-string major and minor arpeggios at extremely slow tempos like 40-50 BPM and prioritize clean note separation over speed.
Sweep picking demands patience. Most players try to go fast too early, building sloppy habits that take months to correct. Let cleanliness dictate your tempo, not ambition.
Solos to Learn at Every Level
Learning actual solos is where scales and techniques become real music. Each solo teaches phrasing, note choice, and musical structure in ways that isolated exercises never can. Our complete guide to beginner guitar solos covers the learning process in detail. Here are recommended solos organized by level.
Beginner Solos
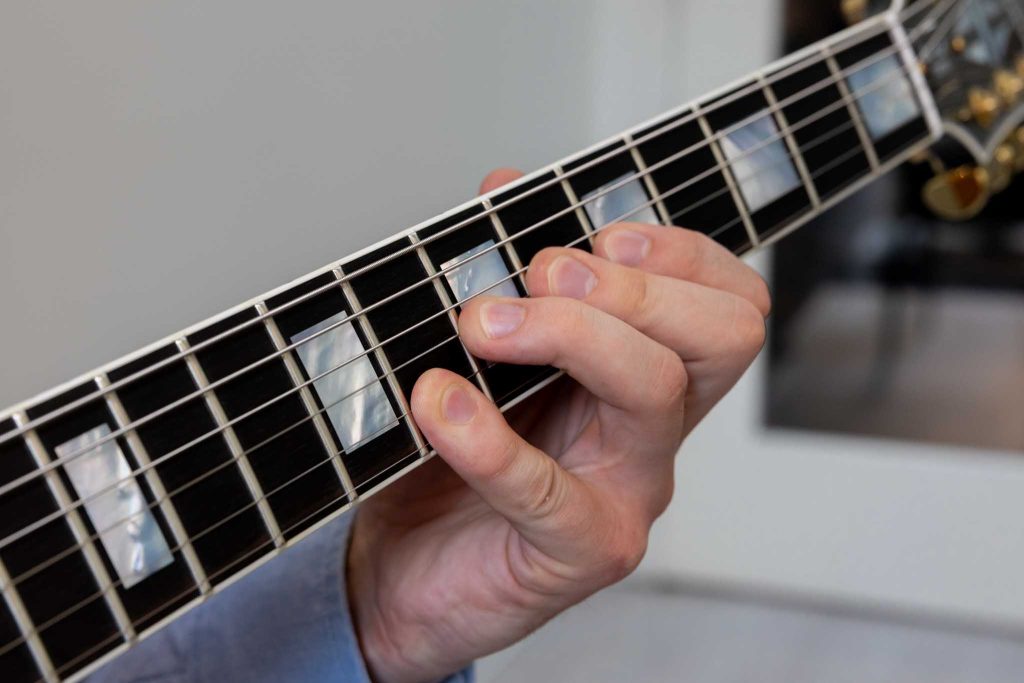
These solos use the pentatonic and blues scales with basic techniques. They teach phrasing, dynamics, and musical expression at a manageable tempo.
“Seven Nation Army” by The White Stripes: A single-string melody that teaches rhythmic precision and the power of simplicity.
“Let It Be” by The Beatles: A melodic masterclass in pentatonic phrasing with beautiful bends and vibrato.
“Hey Joe” by Jimi Hendrix: Expressive pentatonic playing with slides, bends, and natural call-and-response phrasing.
“Nothing Else Matters” by Metallica: Dynamic control and emotional expression through a longer solo format.
“Californication” by Red Hot Chili Peppers: Clean tone, melodic construction, and touch sensitivity.
“Comfortably Numb” (1st Solo) by Pink Floyd: David Gilmour’s legendary phrasing with every bend, every pause, every vibrato is deliberate and expressive.
Intermediate and Advanced Solos
These solos incorporate advanced techniques and demand greater fretboard fluency, speed, and musical maturity.
“One” (1st and 2nd Solos) by Metallica: Combines melodic phrasing with tapping, fast alternate picking, and legato runs.
“Eruption” by Van Halen: The tapping showcase that changed rock guitar. Requires strong tapping technique and rhythmic control.
“Crazy Train” by Ozzy Osbourne: Randy Rhoads’ neoclassical approach with fast scale runs and precise bending.
“Technical Difficulties” by Paul Gilbert: A masterclass in alternate picking, string skipping, and 3NPS speed.
“Altitudes” by Jason Becker: Advanced sweep picking, tapping, and legato at the highest level of technical guitar.
How to Learn a Solo Effectively
There’s a proven method for learning solos that works better than the way most guitarists approach it. Following this process will help you learn faster, retain solos longer, and extract more musical lessons from each piece you study.
Step 1: Listen actively before playing. Listen to the solo 10-15 times before touching your guitar. Hum along. Identify where phrases begin and end. Notice the dynamics and emotional arc. Understanding the architecture first makes the physical learning dramatically easier.
Step 2: Break it into phrases. Never try to learn a solo start-to-finish in one pass. Identify 2-4 bar phrases and master each one individually before connecting them. This is how professional musicians learn everything, in small, manageable pieces that build into a complete performance.
Step 3: Start at half speed. Use a metronome or slow-down app at 50% of the original tempo. Play each phrase perfectly at this speed before increasing. Your muscle memory doesn’t distinguish between “practice tempo” and “performance tempo”; it memorizes whatever you repeat, including mistakes.
Step 4: Focus on technique details. Are the bends hitting the target pitch? Is the vibrato consistent and controlled? Are slides landing on the correct fret? These details separate a rough approximation from an accurate performance, and they’re what train your hands for your own improvisation later.
Step 5: Play with the recording. Once you can play the solo cleanly at full speed in isolation, practice it alongside the original track. This develops your timing, feel, and ability to lock in with a rhythm section. These skills that transfer directly to live performance.

Finding Your Voice as a Lead Guitarist
Your voice on guitar isn’t a technique, a scale, or a speed threshold. It’s the result of taste, intention, and consistency. It’s how you choose notes, how you shape silence, how you respond to the music happening around you.
Most players think their voice will come from learning more scales, licks, and techniques. In reality, your voice emerges from restraint. Great lead guitarists don’t play everything they know. They play what the moment calls for. They repeat ideas. They leave space. They let notes ring longer than feels comfortable.
Every guitarist begins by imitating heroes. That’s how musical language works. You borrow phrasing. You absorb tone and feel. Your own voice starts to emerge when you stop copying entire solos and start borrowing individual ideas, combining influences naturally, and developing preferences about which notes and textures resonate with who you are as a musician.
Techniques give you access. Theory gives you understanding. Practice gives you consistency. But your voice comes from listening, restraint, and intention. If you can say something meaningful with fewer notes, you’re already on the right path.
Practice Strategy for Working Professionals
If you’re a working adult, and most of our students at Musicians Playground are, here’s a realistic practice framework that produces real results within the constraints of a busy professional life.
The 20-30 Minute Daily Session
5 minutes: Warm-up with legato scales. Play through a pentatonic scale using only hammer-ons ascending and pull-offs descending. This warms up both hands while reinforcing a fundamental technique.
5 minutes: Focused technique drill. Rotate weekly between specific techniques bending accuracy one week, vibrato consistency the next, alternate picking speed the week after. Deliberate, slow practice with a metronome.
10-15 minutes: Musical application. Work on a solo you’re learning, improvise over a backing track, or practice combining techniques in musical contexts. This is where isolated drills become real playing.
5 minutes: New material. Learn a new scale position, study a new section of a solo, or explore a new technique. Keep this fresh and engaging to maintain motivation.
The Long-Term Progression
Months 1-3: Minor pentatonic in all five positions. Basic techniques: slides, hammer-ons, pull-offs. First beginner solos. Focus on timing and clean playing.
Months 4-6: Blues scale and major pentatonic. Add bending and vibrato. Connect scale positions for fretboard freedom. Learn 3-4 complete solos.
Months 7-12: Full major and minor scales via CAGED. Alternate picking development. Introduction to modes. Begin improvising confidently over backing tracks.
Year 2+: Harmonic minor, melodic minor, and modes. Advanced techniques based on your interests. Regular improvisation and performing with other musicians.
Consistency beats intensity. Twenty minutes of focused daily practice produces dramatically better results than sporadic two-hour sessions.
Making the Most of Limited Practice Time
Adult learners often feel guilty about not practicing enough. Let go of that. The reality is that focused, intentional practice, even in short sessions, compounds powerfully over time. Here are strategies specifically for busy professionals:
Practice one thing deeply rather than five things superficially. In a 20-minute session, spending the entire time on one scale position or one solo section produces better results than rushing through five different exercises. Depth beats breadth in skill development.
Use “micro-sessions” throughout the day. Keep a guitar accessible and play for 5 minutes between meetings or while waiting for dinner to cook. These small sessions add up and keep your fingers familiar with the instrument even on busy days.
Record yourself weekly. Spend one minute recording a short improvisation or the solo you’re working on each week. Listening back reveals progress you can’t feel in the moment and identifies areas that need attention. Over months, these recordings become a powerful motivational archive of your growth.
Set monthly goals, not daily goals. “Learn the first solo of Comfortably Numb this month” is more sustainable and less anxiety-inducing than “practice bending for exactly 10 minutes today.” Monthly goals accommodate the natural rhythm of busy professional lives where some days you have 30 minutes and others you have zero.
Why Playing with Others Accelerates Everything
Lead guitar exists in the context of a band. Practicing alone develops your individual skills, but playing with others teaches you to listen, respond, adapt, and make musical decisions in real time. It’s where theory meets reality and where techniques become tools for communication.
This is why our BAND+ program has been transformative for so many of our guitar students. It’s a curated 12-week band experience for intermediate and above players that culminates in a live performance at a Boston venue. For adult learners, having a structured ensemble setting with other serious musicians provides the context that solo practice can’t replicate.
If you’re not ready for a band experience yet, even jamming informally with one other musician, whether it’s a friend who plays bass or a drummer you found on a forum, will teach you things about lead guitar that no amount of soloing alone can match.
Getting Started with Expert Guidance
This guide gives you the roadmap. But a roadmap and a guide are different things. An experienced instructor sees what you can’t hear in your own playing, whether it’s the bend that’s slightly flat, the vibrato that’s uneven, or the hand position that’s limiting your speed. They identify the specific adjustments that produce the fastest improvement and build a learning path tailored to your goals, your schedule, and the music you love.
At Musicians Playground, our guitar instructors are working Boston musicians who specialize in teaching adults. We understand that you’re not a teenager with unlimited practice hours. You’re a professional who wants real results in a realistic timeframe. Our lessons are designed around that reality, focusing on high-impact instruction that fits your life.
We’re located at 33 West Street in Boston’s Downtown Crossing, and we offer a $100 Intro Week that applies toward membership so you can experience our teaching approach before committing. Whether you’re picking up lead guitar for the first time or you’ve been playing for years and want to finally break through to the next level, our instructors will meet you where you are.
It’s never too late to become the guitarist you hear in your head. The only question is whether you start today.
Frequently Asked Questions
How long does it take to learn lead guitar?
Most adult learners can play simple solos within 2-3 months and improvise basic leads within 6-12 months. Developing a confident, distinctive voice on lead guitar is an ongoing journey that deepens over many years. The timeline depends on practice consistency, starting skill level, and whether you’re working with an instructor.
Do I need to learn rhythm guitar before lead guitar?
Basic chord knowledge helps because understanding chords improves your lead note choices. But you don’t need to master rhythm guitar before starting lead. Many students develop both simultaneously. Our lead vs rhythm guitar guide explores how both disciplines support each other.
Is it too late to learn lead guitar as an adult?
Absolutely not. Adult learners bring advantages that younger students often lack, such as musical taste developed over decades of listening, patience for deliberate practice, and discipline for consistent work. Many of our most accomplished students at Musicians Playground started as complete beginners in their 30s, 40s, 50s, and beyond.
What guitar do I need for lead guitar?
Any electric guitar works. A guitar with a comfortable neck profile and low action (string height) will make techniques like bending, hammer-ons, and vibrato easier. Single-coil pickups offer clarity for clean lead tones; humbuckers provide warmth and sustain for overdriven sounds. Your instructor can help evaluate your setup.
What’s the most important thing to practice for lead guitar?
Phrasing and timing. Most beginners focus on scales and speed, but the ability to place notes intentionally within a rhythmic context is what makes lead guitar sound musical rather than mechanical. Practice with backing tracks, focus on clean execution, and prioritize expression over complexity.
How is lead guitar different from rhythm guitar?
Lead guitar focuses on melodies, solos, and improvisation, while rhythm guitar provides the harmonic and rhythmic foundation through chords and riffs. Both are essential to a complete guitarist’s skill set. Read our full comparison for a detailed breakdown.
What scales should I learn first for lead guitar?
Start with the minor pentatonic scale. It sounds great over the widest range of music and forms the backbone of countless solos. Then add the blues scale and major pentatonic. Our scales guide lays out the complete learning sequence.
Can I learn lead guitar on an acoustic guitar?
Yes, though techniques like bending and tapping are more physically demanding on acoustic due to higher action and heavier strings. An electric guitar is easier for lead technique development. That said, practicing on acoustic builds hand strength that makes electric playing feel effortless.
Do I need to read music to play lead guitar?
No. Most rock and pop lead guitarists work from tablature, chord charts, and ear training rather than traditional notation. Understanding basic music theory (scales, intervals, chord progressions) is helpful but can be learned alongside your playing rather than as a prerequisite.